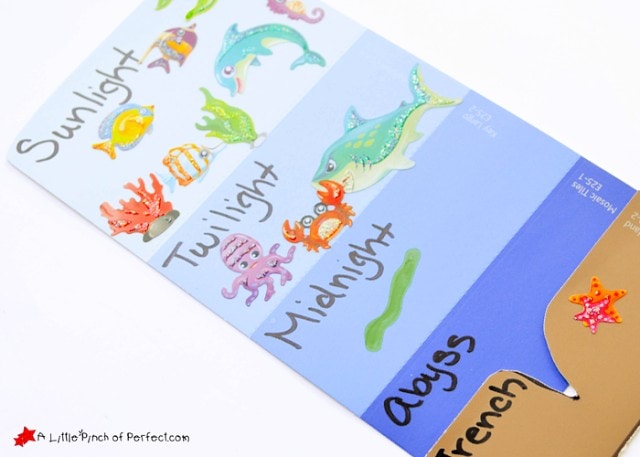
With different colored paper or paint samples, kids can make a Layers of the Ocean craft to learn about the properties of each depth of water.
Thank you for visiting. This post may contain affiliate links to recommended products at no extra cost to you. Read our Disclosures and Terms of Use. Don't miss out again, become a Reader here <--it's FREE.
We have been enjoying learning about the Ocean and especially sea animals but we had never talked about the layers of the ocean until now. Paint samples work perfectly to represent the different levels, but if you don’t have any on hand you can always use layers of paper. When we were finished with this activity we had learned what type of animals live at different depths, what the different zones are called, and had a cute craft to help us remember and decorate our wall.
To start this activity we put our hands on top of each other to make sure everyone understood what layers are. Then we watched this video about Oceanic Layers and Zones (Youtube video by ). Finally we went on a field trip to the aquarium I had my kids look at how much light was in the fish tanks, then we figured out which layer of the ocean the animal was from. These Oocean Zones Worksheets would also be great to add to this learning activity as well as making an ocean zone density jar.
Information About the Oceanic Zones
- Sunlight Zone 0-600 feet closest to top 90% of ocean animals live here, sharks, sea turtles, seals, jellyfish, plants
- Twilight Zone 600-3300 ft no plants, animals live here like cold water and darkness, crabs, some sharks, lobsters
- Midnight Zone 3300-13200 feet – not very much food, only light is made from animals, squid, eels
- Abyss-near freezing, no light, very few animals, largest part of the ocean
- Trenches-deepest part of ocean, temp barely above freezing, starfish and worms.
Learning About the Layers of the Ocean Craft
 |
| Pin me please! 🙂 |
Supplies:
Paint samples (blue and brown-we used Dutch Boy samples)
Under the Sea Sticker Set (affiliate link)![]() -similar sticker set to what we used.
-similar sticker set to what we used.
Permanent marker
If you can’t find stickers, you can always try drawing animals. I drew a little eel on each of our crafts.
1. Cut a brown layer to make a trench and glue it onto the bottom of the blue paint sample but maker sure not to cover it completely.
2. Label the layers of the ocean with the marker starting with the lightest layer first.
We sounded out the words together by identifying the letters, then I wrote the name of the layer on the paint sample. If your kids are writers they could write the names by themselves.
3. Put the ocean animal stickers on the craft making sure to put them in the correct layer.
can be found in more than one layer (like different types of sharks). When this
happened we just chose the layer we didn’t have as many stickers for. First we
sorted our stickers into which layer the animals belonged to and then the kids
stuck them on their craft. If your child is older you could have them sort
while they are sticking them on. This would be a fun way to review and see how much
they learned.
More Ocean Activities
Thanks for learning with us today! Please click here to sign up for our weekly newsletter and follow us on Facebook, Pinterest, Twitter.
Have a great day!


Thank you for sharing.
What a great educational activity!
Hi Alison, Thanks so much!