We haven’t marbled anything since our Marbleized Easter Eggs, so when I signed up to do a marbling activity for the Painting Challenge (Fun Painting Techniques) hosted by Louise from Messy Little Monster I knew this would be a fun new art technique we could explore and add our own creative touch. This technique doesn’t require any specialized paints, and is inexpensive to do. One of my daughter’s favorite parts about our technique is we could add glitter to our marbling tray. We tried a lot of different techniques using different paints (expensive), crayons (too hot!), and nail polish (didn’t work right) and this was by far our favorite and easiest!
Thank you for visiting. This post may contain affiliate links to recommended products at no extra cost to you. Read our Disclosures and Terms of Use. Don't miss out again, become a Reader here <--it's FREE.

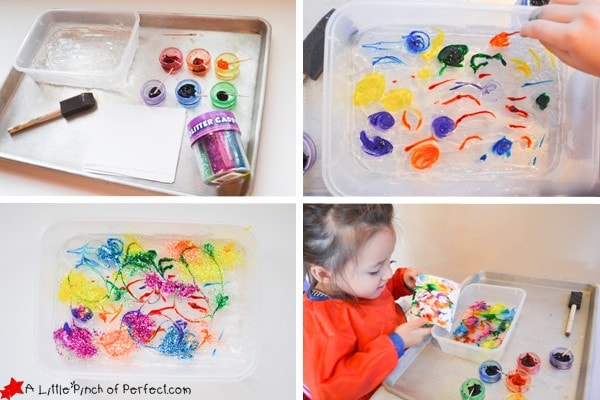
How to Make Marbled Glitter Paper
Supplies:
Gel food coloring (We used Wilton brand colors) -If you are planning on using your food coloring for food after this art activity, put a small amount of the food coloring in small containers to use, that way hair gel won’t be in your food in the future)
Toothpicks
Cheap hair gel
Spoon
Thick craft paper
Tray
Glitter (Optional)
Sponge brush (Optional)
Directions:
We have been playing around with our camera and at the request of my daughter who loves YouTube, have started recording video tutorials. Our first one being our Kinetic Sand video. Here is our second video so you can see the excitement of this activity first hand! Click Here!

1. Fill the tray with an even layer of hair gel.
2. Dip toothpicks in the food coloring and then dip it in the gel to add color to it. If you want to add glitter, now would be the time to sprinkle some on. Once all the color is added, swirl the colors around to marbleize. Too much swirling will make the colors look muddy so try and refrain from over swirling (it’s really fun to do, so it is really challenging to stop).
3. Take the paper and gently press it on the top of the hair gel. Lift the paper up and set it out to dry. You can make several marbled papers using the same batch of hair gel. We used a sponge brush to scrape off the top layer of the hair gel then repeated the process.
More Process Art Ideas


Have a great day!
Love, Katie & the Kiddos
I have teens who want to explore using oil on water paper techniques. We are a local library and I try to always give them what they want because many of them never get to experience art unless it is something I do with them or the very rare occasions where they get something at school!
I watched the video above and thought it was so cute, she is a wonderful little actress! lol I have never thought of or seen this method used and I have a couple questions. First: Is there a problem with stickiness after drying? Second: what did you use for color? It looks to be food coloring gel but I am just curious.
I have a background in Preschool/Montessori education so this really sparked my interest from that avenue as well.
Now for me to give you an idea! You can take the same type of technique and get beautiful results using shaving cream and food coloring. All you have to do is put a large tray with a generous amount of shaving cream squirted all over the surface and them sprinkle dots all over the top randomly. You can take a skewer and swirl it around but if you want to see what you get as the prints progress that is pretty amazing as well. Be careful though because it will bleach clothes if they aren’t protected.
You can also teach color mixing with shaving cream in a zip bag and food coloring. They get to mush it all around and see it change color before their eyes! So cool at Halloween time because you can then turn it into a jack-o-lantern!
Have fun! Hope this sparks some great fun!
Hi Candie, The artwork wasn’t sticky at all once dry. I guess the results may depend on what type of hair gel you use, but we just used the cheap stuff and had no problems. The color is from food coloring. Thanks for the ideas!!! I have been meaning to try marbling with shaving cream and the color mixing activity sounds just like something we would enjoy. Thanks so much!
Using gel is such a good idea and I love the video. 🙂
OMG I was browsing though your posts looking for ideas but we did this one just last weekend! I've a post ready to go soon 🙂
We marbled with oil and only one color though. The pictures come out great don't they!
Swapna
@ThePracticalMomBlog.BlogSpot.in