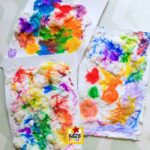
Puffy Paint Process Art for Kids
Create colorful 3D artwork using a simple puffy paint mixture made from shaving cream and glue. Kids can explore texture, color mixing, and creativity as they paint and add liquid watercolors to make unique raised designs. This open-ended process art activity is perfect for home, classrooms, or art centers.
Materials
- Shaving cream
- White school glue
- Bowls or containers
- Craft sticks or spoons for mixing
- Paintbrushes
- Cardstock or heavy paper
- Liquid watercolors
- Dropper or pipette (optional)
Instructions
- Mix equal parts shaving cream and white glue in a bowl until combined.Spread the puffy paint onto cardstock using a paintbrush.Cover the paper completely or create designs and patterns.Add drops of liquid watercolor onto the wet puffy paint.Use a brush, craft stick, or the tip of a paintbrush to swirl and blend colors.Continue experimenting with color combinations and designs.Set the artwork aside to dry completely.Once dry, enjoy the raised 3D texture and colorful finished artwork.
Notes
Tip: The final texture may vary depending on the brand of shaving cream used and how thickly the paint is applied. Some artwork will stay very puffy, while other pieces may flatten slightly as they dry. The glue helps the paint stick to the paper, but extra-thick areas can crack or flake if bent or handled frequently. For best results, use cardstock or heavy paper and allow the artwork to dry completely before displaying.
Variations
- Try neon or fluorescent liquid watercolors for extra-bright artwork.
- Create seasonal color palettes for holidays and themed units.
- Use droppers to strengthen fine motor skills.
- Experiment with different painting tools such as cotton swabs, craft sticks, or small combs.
- Use tools to scrape away parts of the puffy paint to add more designs and texture.
- Make abstract designs or challenge older kids to create landscapes, flowers, or patterns.