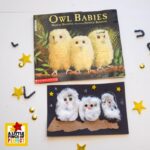
How to make an Owlet Craft inspired by Owl Babies
Simple step-by-step directions for making your own fluffy cotton ball owlets inspired by Owl Babies.
Materials
- Black paper or cardstock (for background)
- Brown paper bag or brown paper (to tear into a branch)
- Cotton balls
- School glue
- Googly eyes
- Orange paper (for beaks)
- Chalk (white or light colors, for outlines and details)
- Optional: Gold glitter, star stickers, chalk
Instructions
- Set Up Your Background — Start with a piece of black paper — this will be your night sky! Black is perfect for giving your owls that cozy, nighttime feel, just like in the story.Tear Your Branch — Rip a strip of brown paper to create a rough, natural-looking branch. Don't worry about making it perfect — the torn edges give it a wonderfully woodsy look! Lay it across the lower part of your black paper and glue it down.Draw Your Owl Outlines — Use chalk to draw three simple owl shapes on the black paper above the branch, one for each owl baby! They can be big or small, round or tall — there's no wrong way to sketch them out.Fluff and Glue Your Cotton Balls — Pull apart your cotton balls so they're nice and fluffy, then glue them inside each owl outline to fill it in. We loved how soft and full our owls looked once the cotton was all spread out. Layer them and overlap them until your owls look good and fluffy!Add the Details — Use chalk to draw wings, feather lines, or any little details you'd like on top of the cotton. Then cut small triangle beaks from orange paper and glue one onto each owl. Add googly eyes and you've got three adorable owl babies staring back at you!Decorate the Night Sky — Stick gold glitter star stickers all around the sky to make it feel magical and bright. We scattered ours all over, but kids can put them wherever they like — cluster them together, spread them out, or make a constellation!
Notes
Try These Fun Variations
- Try it with watercolors! Instead of a black piece of paper, let kids paint a dark blue or purple night sky with watercolors first, then let it dry before adding the owls. It gives the background a beautiful, soft look that feels just like a moonlit night straight out of the book.
- Make it a torn-paper owl! Instead of cotton balls, kids can tear small pieces of brown, tan, or gray tissue paper and layer them onto the owl outlines for a textured, feathery look. We loved how each owl ended up looking totally different depending on how the pieces were layered — there's no wrong way to do it!
- Add a moon! Cut a circle from yellow or white paper and glue it onto the night sky background before adding the owls. Kids can even use a white crayon or chalk to draw swirly clouds around it. It makes the whole scene feel extra magical and cozy.
- For older kids, try turning this into a mixed-media scene by adding a chalk-drawn tree with branches spreading across the background before gluing down the owls. It takes a little more time but the finished result looks so impressive — and kids feel so proud of it!
- Make a whole owl family! Instead of three owls, let kids make as many owls as they want — a mama, a papa, and lots of babies. We used different sizes of cotton balls to show the bigger and smaller owls, which is a sweet way to connect the craft back to the story and talk about families.