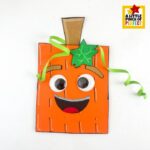
How to make a Pumpkin Paper Bag Craft with Free Template (Inspired by Spookley!)
Materials
- Brown paper bag (lunch size)
- Orange, black, brown, green paper
- Glue or gluestick
- Scissors
- Black, white, orange, green marker
- Free printable template
- Optional: Googly eyes, Green ribbon
Instructions
- Gather Your Supplies — Before you get started, pull together everything you'll need: a brown paper bag, orange construction paper, black and brown construction paper or cardboard scraps for the face pieces and stem, green paper for the leaf, green curly ribbon for the tendrils, googly eyes, markers (including black, white, and orange), scissors, and a glue stick. If you'd like, you can grab the free printable template at the bottom of this post to help cut out the stem, leaf, and face shapes!Prep the Bag — If your paper bag looks more like a rectangle than a square, you can trim the top edge down to make it squarer — this gives it that fun Spookely-inspired look! Then cut a piece of orange construction paper the same size as the front of the bag and glue it right onto the front of the bag.Decorate the Orange Pumpkin— Now for the fun part — give your pumpkin some texture! Use black and white markers to draw lines and details across the orange paper to make it look like a real pumpkin. We added curved lines going down like the ribs on a pumpkin, but kids can make their marks however they like.Cut Out the Face Pieces — Using the free printable template (or free handing it — both work great!), cut out the eyebrow strips, a big smiling mouth shape, and a small lip piece from your construction paper or cardboard scraps. We used tan for the eyebrows, dark gray for the mouth, and red for the lip, but kids can pick whatever colors they love.Make the Green Top — Cut out a leaf shape from green paper using the template, then cut several pieces of green curly ribbon for the tendrils. To curl the ribbon, just run it along the edge of your scissors. Cut a stem shape from brown paper or cardboard as well. These three pieces will make up the top of your pumpkin!Put It All Together — Now it's time to bring your pumpkin to life! Glue the face pieces — eyebrows, mouth, and lip — onto the orange panel on the front of the bag. Add the googly eyes, then glue the stem, leaf, and curly ribbon tendrils to the top of the bag. We arranged our leaf to one side and let the tendrils curl out around it, but there's no wrong way to put it together. Move things around until it looks just right to you — every pumpkin turns out a little different, and that's what makes each one so special. Have fun!