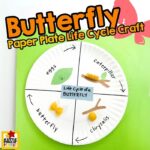
Butterfly Life Cycle Paper Plate Craft
Kids of all ages will love creating this Butterfly Life Cycle Paper Plate Craft.
Materials
- Green, brown, blue paper
- Large paper plate
- Black marker
- White rice
- Scissors
- Ruler
- Glue
- Pasta, Rotini = Caterpillar, Shell = Chrysalis, Bow tie = Butterfly
Instructions
- Divide the Paper Plate: Start by dividing the paper plate into four equal sections with a ruler and a black marker. Create the Egg Stage: Next, cut a small leaf shape from green construction paper. Glue the leaf onto the first section of the paper plate. Then, spread a small amount of white rice onto the leaf to represent butterfly eggs.Add the Caterpillar Stage: Cut out a branch shape from brown construction paper. Glue the branch onto the second section of the plate. Attach a piece of rotini pasta onto the branch for the caterpillar.Make the Chrysalis Stage: Cut another brown branch from construction paper. Glue it onto the third section of the plate. Attach a shell pasta hanging on the branch to represent the chrysalis stage.Complete the Butterfly Stage: In the fourth section, glue a bow tie pasta to symbolize the adult butterfly. Finally, you can color the bow tie with markers to make it colorful.Final Touches: Draw arrows between each section to show the maturity of the butterfly's life cycle. Cut a rectangle from blue construction paper and glue it to the center of the plate. Write “Life Cycle of a Butterfly” on the blue rectangle with a marker. Let everything dry before handling!