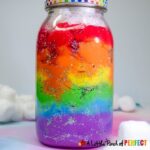
How to Make an Easy Rainbow Jar Kids Craft
Follow these easy directions to make a Rainbow Jar with your kids or with anyone who loves rainbows (teens, and adults included). The jars look bright and cheery and are simple to make. This craft is perfect for spring, including in a science weather unit, learning about absorption, or having some St. Patrick's Day fun! https://alittlepinchofperfect.com/how-to-make-an-easy-rainbow-jar-kids-craft/
Equipment
- Large Quart mason jar-affiliate link (You can use any jar you will just have to change the measurements to match your jar. See adjustment directions towards the beginning of this post)
- Acrylic Paint-affiliate link (red, orange, yellow, green, blue, purple)
- Large craft stick-affiliate link or utensil
- Glitter-affiliate link (Clear, iridescent, and/or silver)
- Approx. 120+ Cotton balls-affiliate link
- Washi tape-affiliate link (optional)
- Water
- 6 cups for mixing in (Shallow cups will be easier to mix in)
- 1/2 c. measuring cup
- 1 tsp. measuring spoon
Instructions
- Fill each cup with 1/2 c. water. There should be 6 total cups.
- For each color, add 1 tsp of acrylic paint to each cup and stir in the color. (red, orange, yellow, green, blue, purple)
- Divide your cotton balls into 6 piles of 20 cotton balls.
- Start with the first pile, pull each cotton ball apart a little bit and place in the jar. We used 15-25 cotton balls per layer. You want the cotton balls to absorb the liquid to show each color in the jar.
- Use the popsicle stick to gently push the cotton balls down.
- Sprinkle glitter on top of the cotton balls.
- Slowly pour the first color of paint on top of the cotton balls. We found that it turned out best when we poured into the middle. We started with the color purple.
- Use the popsicle stick to gently move the cotton balls around until they absorb all the paint. You can add more cotton balls as needed, but make sure not to add too many that parts of the cotton balls are left white. If that happens just mix up a little more paint and water mixture and pour it in.
- Repeat the layers in this order: (purple, blue, green, yellow, orange, red)
15-25 separated cotton balls gently pressed down with a popsicle stickGlitterOne color of paint slowly poured into the middle Cotton balls gently moved around to absorb the extra paint - Secure the lid on the mason jar.
- Optional: Add washi tape around the rim of the lid. Now you can enjoy a rainbow without a cloudy day :).
Notes
- Don't press down so hard with the popsicle stick that the paint squeezes out of the cotton balls because the colors will mix and look muddy.
- Use a funnel to help kids pour the paint in.
- If there is space left at the top you can add a layer of white cotton balls for clouds or add in another layer of paint and water mixture.
- Keep the jar fairly still after assembled to keep the colors separate.
- Eventually the colors will mix. Just like a real rainbow, they don't last forever but are certainly enjoyed while they do.
- If your child wants to leave parts of their cotton balls white, it's totally okay.