Oreo Spider Cookies: A DIY Halloween Treat
Learn how to make a creepy crawly Oreo Spider Cookie to make a DIY Halloween Treat that's perfect for your party!
Equipment
- 2 Small Microwave-Safe Bowls or Candy Melter
- Spoon
- 2 Piping Bags
- Optional: Oreo Candy Mold
Ingredients
- 12 ounces of white or white chocolate candy melts (This Set of Candy Melts has both the White and chocolate melts that you need)
- 6 regular Oreos (These Pumpkin Oreos would be yummy or you can use the double-stuffed Oreos if you are not going to use the Oreo Candy Mold)
- ¼ cup chocolate or brown candy melts
- Malted milk balls or other round chocolate covered candy
- Candy eyeballs (These Halloween Colored Eyes would be so fun to use!)
Instructions
- Melt some of the white candy melts. You can place them in a microwave-safe bowl, and microwave them in 30-second increments, stirring in between, until the candy is smooth. Tip: Make sure to keep water out of the candy melts or it won't reach the correct consistency.
- Optional: Oreo Candy Mold-Fill the Oreo Candy Mold 1/4 way full of white candy melt. Place 1 Oreo in the center. Press down on it gently, to secure it in the candy mold. Make sure not to press it all the way down to the bottom of the mold. Spread chocolate on top of the Oreo and fill the candy mold with white candy melt. Repeat to make more cookies, then set aside to set. This can take about an hour. You can place them in the fridge to speed up this process. If the cookie touches the bottom of the mold remove the cookie, and repeat the previous step. Once the candy melt is set, carefully remove the cookies from the mold.
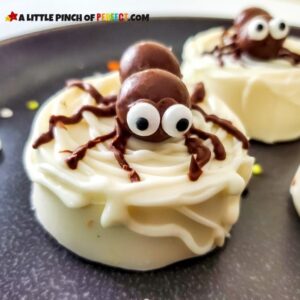
- To make the spider webs, melt some white candy melt and place it in a piping bag, and pipe a spider web pattern. You could do the traditional spider web with radial lines and a spiral, or keep it simple with a spiral.
- To make the spider place 2 malted milk balls on top of the cookie, right next to each other.
- Make a piping bag with melted chocolate candy melts. You may need to reheat your chocolate if it is no longer flowing.
- Pipe 4 spider legs on each side, and fill in the gap between the milk balls with chocolate to give the spider a body.
- Add two dots of chocolate on the front of the spider’s face and attach the candy eyes. Store your cookies in an airtight container until you are ready to serve them.
- Tip for Serving: Add festive Halloween sprinkles to your tray of Oreo Spider Cookies for extra cuteness!
Notes
Tip: The candy melts need to be melted in batches, as needed to make sure it is the right consistency to use or you can use chocolate warmer. This one is our favorite because it keeps the candy melt the right temperature, doesn't burn the melts, and you can turn it on and forget about it until you are ready to use it.